Instructions |
||
|---|---|---|
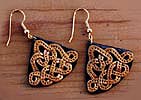
Pattern

|
Step
One: Making a pattern
print out (or trace from the screen) the pattern. Actual size should be approximately 1" wide. Use a photocopier to shrink or enlarge as needed. |
|
Cutting
Pattern

|
Step
Two: Making a transferable pattern
Use the straight pin to punch a closely spaced dotted line through the paper pattern along cutting pattern lines. Notice that what you are doing is outlining the holes (or spaces) in the pattern, and the outer edge. |
|
|
Step
Three: Conditioning the clay
Cut off about half an ounce of clay in the color you will be using for the knotwork pattern. If you are using one of the stiffer clays, hold it in your hands for about a minute to help warm the clay, then begin kneading until it is smooth and pliable. Sculpy will only require a few seconds of kneading to be ready to use. Roll between palms to form a ball, then flatten slightly on work surface. |
||
|
Step
Four: Creating a sheet of clay
Use the brayer to roll clay to about 1/8" thick as evenly as you can, lifting and flipping it over every so often, the way you would for a pie crust. (if you use the pasta machine, begin at the thickest setting and change one notch thinner each time through until desired thickness) |
||
|
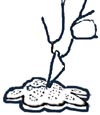
Step
Five: transferring pattern to clay
Gently press the paper pattern into the clay so that the pin holes leave slight impressions. This will be your cutting guide. |
||
Cutting
|
Step
Six: Cutting the pattern
Using the xacto knife, cut out the holes and outer edge. Peel away excess clay from outside edges and use the tip of the knife to remove clay from holes. Use spatula to carefully loosen clay from work surface...you don't want to stretch or distort your pattern. Use scissors to trim outside edges if necessary. |
|